Steps For Growing Garlic in Ohio
 Choosing your garlic planting stock – Your seed stock is the most important facet of growing garlic. It all starts with the clove. Each individual clove is a seed and will grow into a bulb. Beginning with premium garlic planting seed will make a huge difference at harvest time. When choosing your garlic seed select only clean, sound cloves from disease free stock. Plant the biggest cloves of each garlic bulb and eat the small cloves. To separate cloves from the bulb, hold the bulb in one hand and use the other hand to break the cloves free of the bulb. To maximize the size of the bulbs for your harvest you should plant the largest cloves from the largest bulbs. You’ll definitely harvest what you plant so plant the large and eat the small.
How much garlic seed do you need? – One pound of hardneck garlic equals about 40-50 cloves to plant. 1 lb. of cloves will make a single row of approximately 20-25 feet, or a raised bed 6-7 feet long with 3 rows across.
Preparing the soil for planting – The soil is the next most important aspect in growing your garlic. Organic garlic needs good drainage and loamy, fertile soil. Amending the soil with organic matter such as compost, manure, leaf mulch and aged straw is highly recommended. Also, your soil needs to have a neutral PH level between 6 & 7. Soil preparation should be done at least a month or so before planting. We have found that planting in raised beds works best. It’s important to rotate crops at least every two years. This allows the soil to recover and prevents the chance of pests and disease.
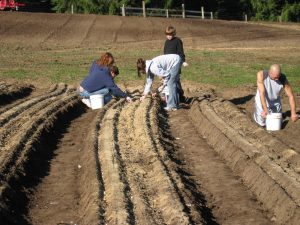
Planting Garlic – When do you plant the garlic? In Ohio, we start planting around late October through November. This is a good guide line for almost all climates. Plant at the turning point of the seasons; with enough time for planting garlic before the ground is frozen. Try to allow 3 to 4 weeks for the cloves to settle into their winter beds, this will help the leaf development in the spring. Plant the garlic seed 5 to 6 inches apart with the tips up. Cover the top with 1 1/2 to 2 inches of amended, loose dirt and gently pat down the top layer of soil.
Garlic is usually planted in the fall but can be spring planted. Spring planted garlic will harvest at the same time as fall planted. Spring planted bulbs will be smaller in size but have great flavor and store longer.
Mulching and irrigating – After your garlic stock is planted in the ground, it is essential to cover it with a nice layer of mulch. There are many different types of mulch from which to choose. There is aged straw(be sure there are no seeds), leaf mulch, grass clippings and organic compost. Mulch will protect your garlic seed in the cold months, prohibits weeds, keeps the earth cool and moist in the hot months and protects your top soil from blowing away. Garlic needs to be kept evenly moist. Uneven watering may result in irregular shaped bulbs. That is why good soil and mulching is so important. Water your garlic regularly during the leaf production stage. The most critical time for watering is mid May through mid June when the bulbs are forming. Lack of adequate watering during this time may result in smaller bulb size. Stop watering 2 weeks prior to harvest.
Apply some nitrogen rich foliage feed 2 to 3 times in the spring.
Garlic does not like weeds ! We don’t use any type of weed control on our garlic. We have found that keeping the adequate layer of mulch on the fields really helps with controlling the weeds. The garlic shoots are quite strong and have no trouble coming up through the mulch in the spring.
When to harvest garlic – Hardneck garlic, as it grows, will begin to form scapes with bulbils. The scapes can reduce the yield of your garlic. It is because the plant is using energy to form the bulbils that could have gone into the formation of the bulb. Remove the scapes before they start to curl by snapping or cutting them off at the top leaf. After you remove the scapes be sure to save a few for eating. Scapes can be used in any number of recipes and are also good chopped like chives raw in soups and salads.
When the garlic plant has 3 to 4 browned leaves it is ready to harvest. To avoid damaging the outer skins, always use a shovel to carefully remove the garlic bulb from the earth, don’t just pull it out. Gently remove the dirt from the roots and outer skin, but don’t remove the outer skin. It is best to harvest when the temperature is cool, either early morning or late evening.
Curing and storing garlic – Bundle the garlic plants with twine and hang to cure. Choose an area with good circulation and out of direct sunlight. Curing garlic will take 3 to 4 weeks. You will know it is ready when you cut the first stalk. If garlic juice oozes from the stalk, it’s not quite ready. Once the garlic is cured, cut off the stalk leaving 11/2 to 2 inches. Trim the roots to 1/4 inch and gently brush off the outer layer of dirt being careful not to peel off the outer skin. The garlic should be stored in a cool dry place 50 to 60 degrees is an ideal temperature. A root cellar or basement is a good storage place. Do not store in a refrigerator. Remember, when choosing which garlic to eat first, always eat the largest first, the smaller garlic bulbs store better.